Build Custom Dashboard Welcome Screens with Beaver Builder
Last updated April 7, 2017 · Arpita

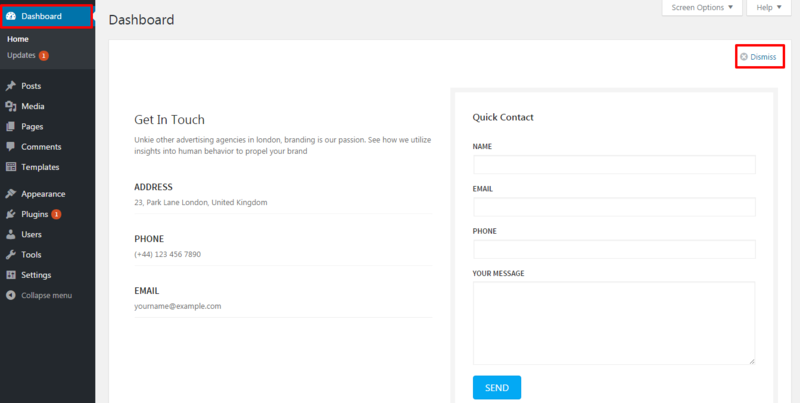
You might be familiar with the WordPress dashboard, it’s the first screen you see when you log into the administration area of your website. A welcome screen always matters for the users when they log into your website.
So, how about if you can personalize your WordPress dashboard and put some valuable content or information for the users?
What exactly Dashboard Welcome Plugin Does?
It gives you full control over your WordPress Welcome Panel using Beaver Builder. You can customize the dashboard with your own content and design just like any other page.
For, eg. you can add a heading, video, images, affiliate links, contact information, themes, plugins, product pricing, or just about anything to the welcome screen. Perform different tasks to help new users or beginners to find their way around.
Star Features Of The Plugin:
- You can assign/create a custom dashboard based on user roles.
- This plugin is multi-site compatible. So, you can use Beaver Builder templates from any site on the network.
- Easy to use and setup.
What’s next?
To add your own WordPress Welcome Dashboard you need to first install Beaver Builder (with the help of Beaver Builder you can design the layout and save it in your builder setting). You can get the free version Beaver Builder Lite from WordPress.org or if you need more features, go ahead with the premium version of Beaver Builder.
Who can all be benefited?
The Beaver Builder Dashboard Welcome plugin can be used by anyone who wants to share valuable information with their users.
Here are some examples of who can use it.
- Web Designers who build and manage client sites. They can add their personalized support form and contact information or promote some other services.
- Site Admin, who handles multiple users. Like the contributors, general FAQ for the visitors, support inquiries and customers to contact with their emails, etc.
- Author, who wants to publish and manage post, set any guidelines, word count, image size and everything related to the post requirements.
- Shop manager, who wants to share every detail about the product, discounts, information, videos, delivery services, sales stats, etc.
How does the plugin work to welcome your users?
- Create a layout with Beaver Builder.
- Go to Beaver Builder plugin settings and select the layout from the dropdown for any user role.
- Save the changes and done!
Creating your own custom Dashboard welcome Screen:
Let’s go with an example.
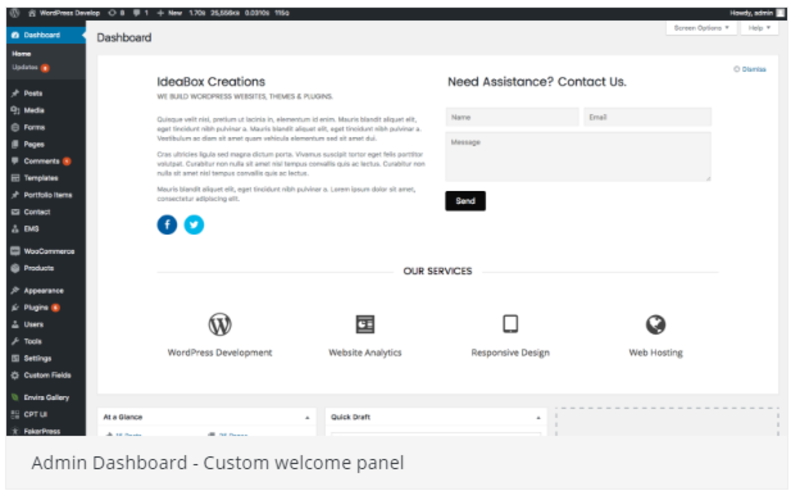
Suppose, you are a site admin and wanted to create a personalized dashboard for your Agency service. Design the layout with all the important information, links, contact details, email and contacting hours for your customers. When your customers is logged in, they will see all the details on the welcome screen.
I have compiled the list of details that you can keep in your custom layout for the users:
- A feedback form to interact with your agency customers.
- Pricing module, to list all the necessary cost of your projects.
- Agency address, contact info, email etc.
- Map in case you want to locate your office address.
- Link to your previous design samples etc.
Let’s quickly get started to design your Agency Contact Form layout:
Step 1: Creating your custom dashboard welcome screen
- Click on Templates> Add New. Give a template title and the launch page builder
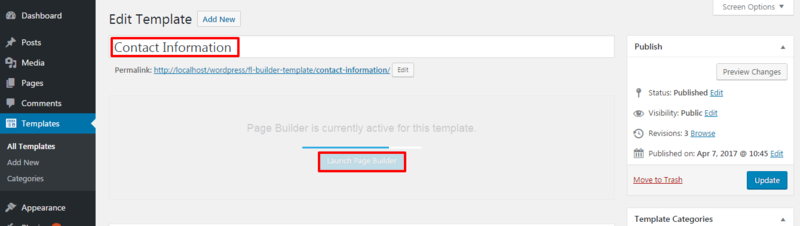
Step 2: Creating the contact info layout using pre-built templates
- Click on the Add Content> Advanced Module> Contact Form. Just drag and drop the Contact Form module.

- Enter all your agency contact details and Save it. If you need to append anything in the module or want to remove you can simply hover over the module and Remove it.
Once you are done with the changes just click on “Save” button. In my case I have designed the Contact Form for you and here’s what my final layout looks like:
Let’s Get Started On – How To Install The Plugin?
Installation takes no time. This plugin can be installed just like any other plugin to your dashboard.
Follow the steps below:
Download the lite version of the Dashboard Welcome for Beaver Builder available on WordPress.org
Step 1: Login & Install the plugin to your WordPress dashboard
- Just click on the Plugins > Add New and type Dashboard Welcome for Beaver Builder in the search bar.
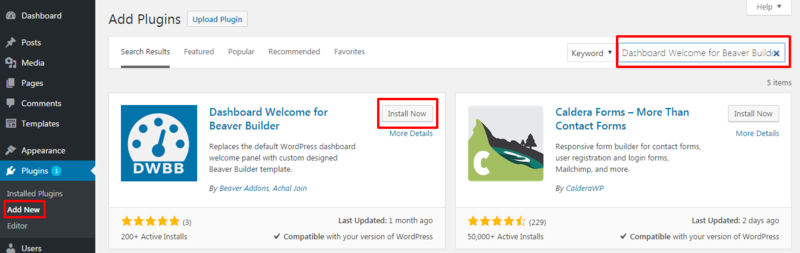
- Click on Install Now and Activate to configure the plugin.
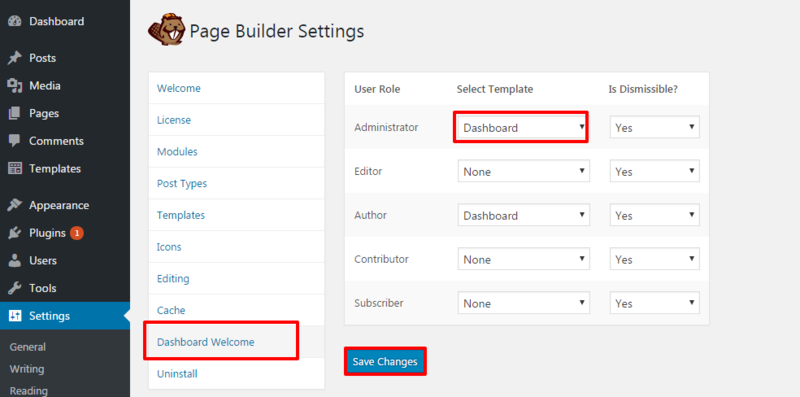
Step 2: Save the designed layout for your WordPress Welcome Screen
- Go ahead and click on the Settings > Page Builder. The layout which you have designed for the users can be saved from your Page Builder Settings.
You can also use the pre-built modules of PowerPack in an affordable and pocket-friendly price. Get upto 50+ amazing modules that will save your time and efforts to customize your welcome dashboard for your users.
That’s it. I hope the above tutorial will help you to personalize your WordPress Dashboard according to your needs. Still have any questions regarding the process? Feel free to comment below, I would be happy to help you.
If you like the tutorial, do share it with your friends and colleagues!
A few more interesting posts →
15 Comments
Leave a Comment

PowerPack Beaver Addons
Start creating beautiful websites with 65+ modules and 350+ templates for Beaver Builder.
Very nice! Thanks for the info… keep it coming, I really enjoy learning more about how to use BeaverBuilder… Have a great weekend!
This is awesome. One question though. How would we go about pulling info from the pre existing dashboard widgets. For example woocommerces recent sales data or wordfences security data. Thanks! ????
Hi Neffrey,
You can’t pull info from other widgets into the Welcome Screen box.
This plugin doesn’t disable any other dashboard widget. So, you can continue using them.
Hi Puneet,
I already used it and I like it very much, but… I’m a bit disappointed as well. The template that I created doesn’t display very well graphically speaking.. I would be willing to help you with this and give you feedback..; Please, let me know where. I really hope that you are going to improve this…
Hi Nathalie,
Thanks for your using it, I would love to hear your feedback.
You can reach me via the Contact Form.
Love it!
Small issue is that if you use shortcode connections via Themer these do not appear.
Example: Creating a header with “Hello [ username ], what would you like to do today”. The shortcode content doesn’t render in the admin page. Any suggested work-a-rounds?
Would love to see the ability to disable specific default widgets as well. It’s a shame we can’t pull those dashboard widgets into our Beaver Builder Dashboard layouts for better styling.
Hi Amber,
Thanks for the feedback. We haven’t really tried using Themer for the admin functionality. So, I will need to check that and see if Themer works for the admin pages or not. Also, can you check if you are using the correct shortcode? Beaver Themer shortcodes have a prefix
wpbbdoes this plugin require beaver themer to create the template for welcome screen
Hi Mark,
No, you only need Beaver Builder.
Does not work for me, I keep seeing the old WordPress dashboard. Tried with all plugins disabled, with no luck.
I made a template and enabled it under Dashboard Welcome. Anything I am overseeing here?
Hi Karl,
Can you email me your site’s login details? I will check what’s going wrong.
Latest BB, latest WP: I don’t see any menu on the left side called “templates” after activating the plugin.
Options within BB Settings are available.
Hi Thomas,
You will need to enable “Builder Admin” from Settings > Page Builder > User Access page.
Select the “Builder Admin” access for Administrator user role and save the settings.
After this, you will see a new menu in left side in WP admin for “Builder”. The “Templates” link is available under this Builder menu.
Thank you!
Any updates on getting the beaver shortcodes working in this? eg.
Welcome etc